by Jan Stverak – Difficulty : Beginner
In this tutorial I will show you how to create a metallic medieval text effect, using a pattern and layer styles.
Tutorial Assets
Before you start creating this text effect, download and install the font and the metal pattern in Photoshop:
- Black brick background
- Cardinal font
- Dirty Metal pattern
1. Create the Background
We will use the Black brick background from the tutorial assets as our document background, which will create a new document 850 x 600 px. To do so, go to Menu > File > Open and open the black-brick-background.jpg.

2. Create the Metallic Medieval Text Effect
This text effect is made of one layer, so when we are done, you can save it as a new style in your Styles palette for future use.
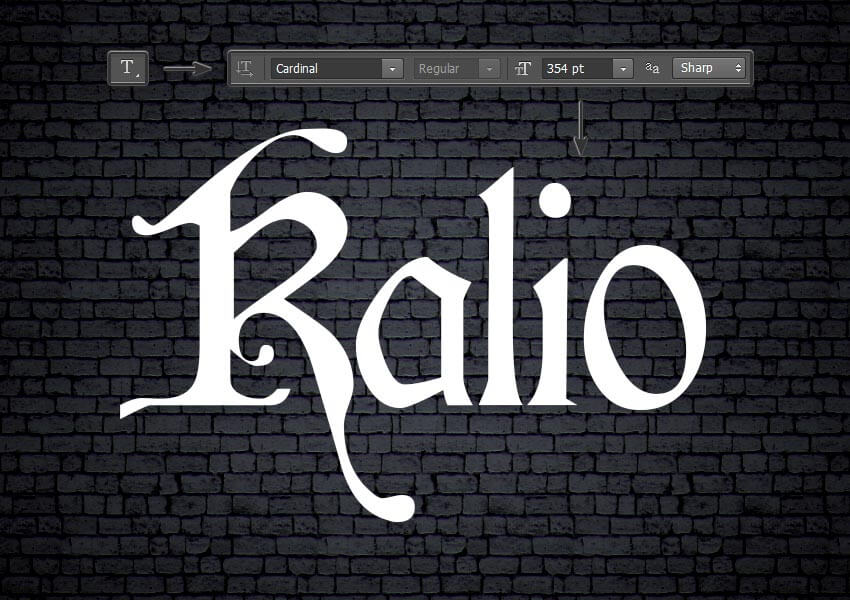
Step 1
Pick the Type Tool and select the Cardinal font. Set the Font Size to 354 pt. Write the word Kalio into the document.
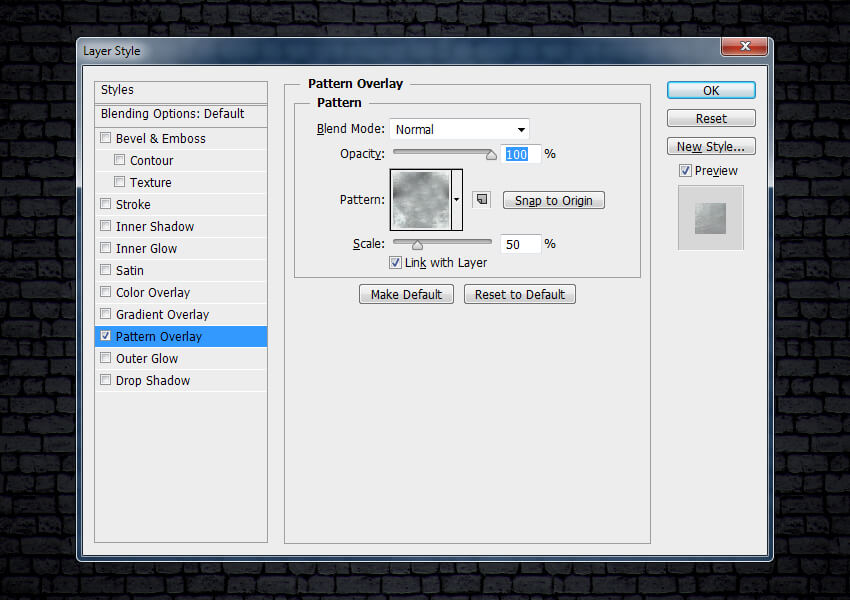
Step 2
Select your text layer in the Layers panel, right click on the layer and choose Blending Options from the menu.
Add a Pattern Overlay with these settings:
- Click on the Pattern box and choose the Dark Metal pattern.
- Scale: 50%
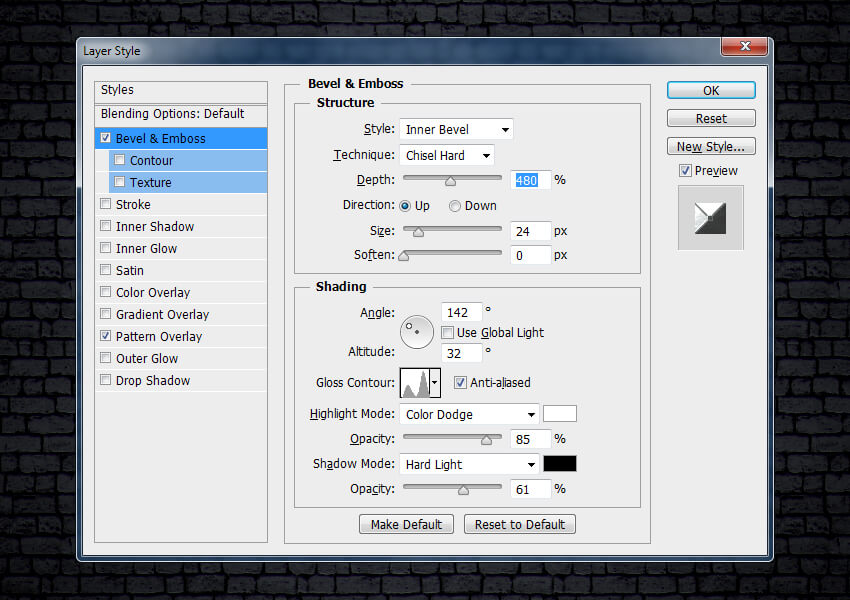
Step 3
Add a Bevel & Emboss with these settings:
- Style: Inner Bevel
- Technique: Chisel Hard
- Depth: 480%
- Direction: Up
- Size: 24 px
- Uncheck the Use Global Light box before setting Angle: 142° and Altitude: 32°
- Check the Anti-aliased box
- Highlight Mode: Color Dodge with Color
whiteand Opacity: 85% - Shadow Mode: Hard Light with Color
blackand Opacity: 61%
Step 4
While you are still in the Bevel & Emboss tab, create a custom Gloss Contour with these settings:
Add six points to the contour curve. To add points, click anywhere on the curve. Now set an Input and an Output for each of these points.
- Point 1 – Input: 0% Output: 0%
- Point 2 – Input: 18% Output: 42%
- Point 3 – Input: 60% Output: 28%
- Point 4 – Input: 73% Output: 91%
- Point 5 – Input: 89% Output: 37%
- Point 6 – Input: 100% Output: 0%
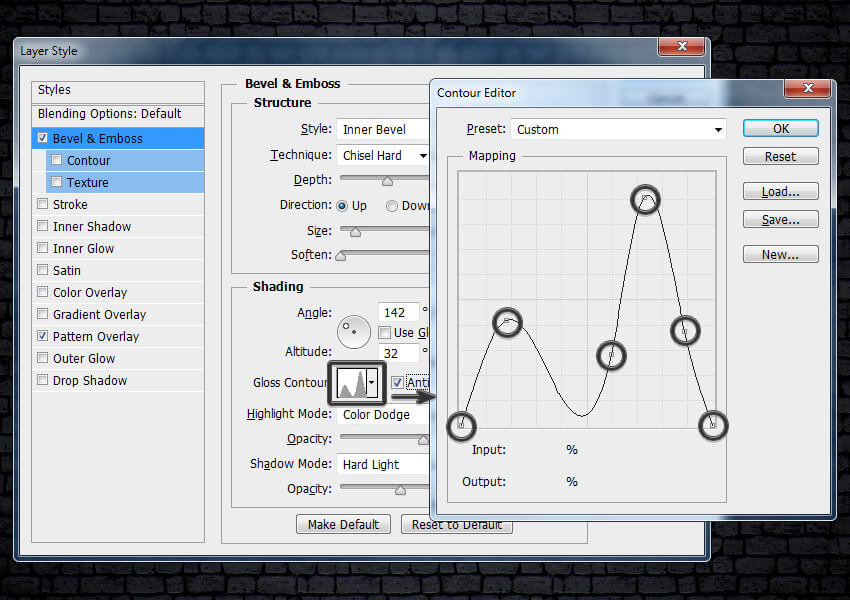
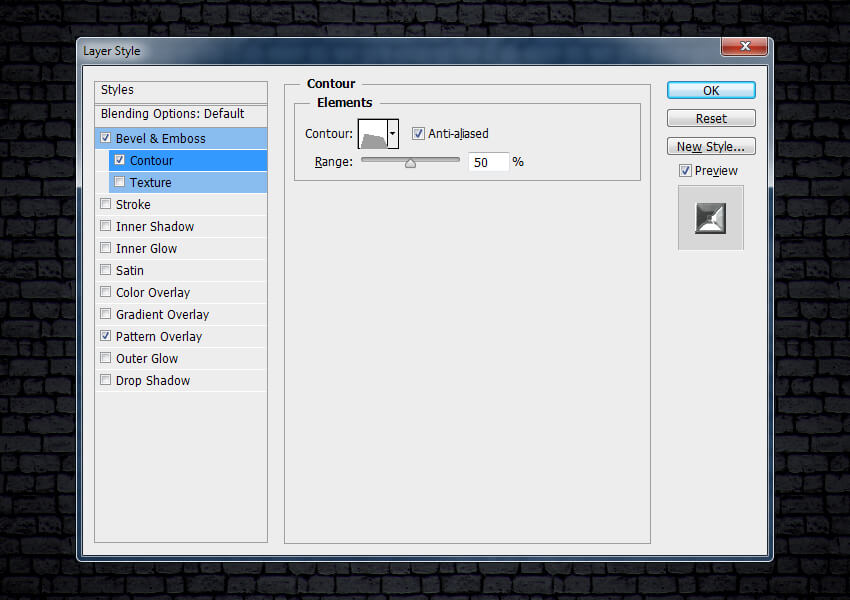
Step 5
Add a Contour with these settings:
- Check the Anti-aliased box
- Set Range to 50%
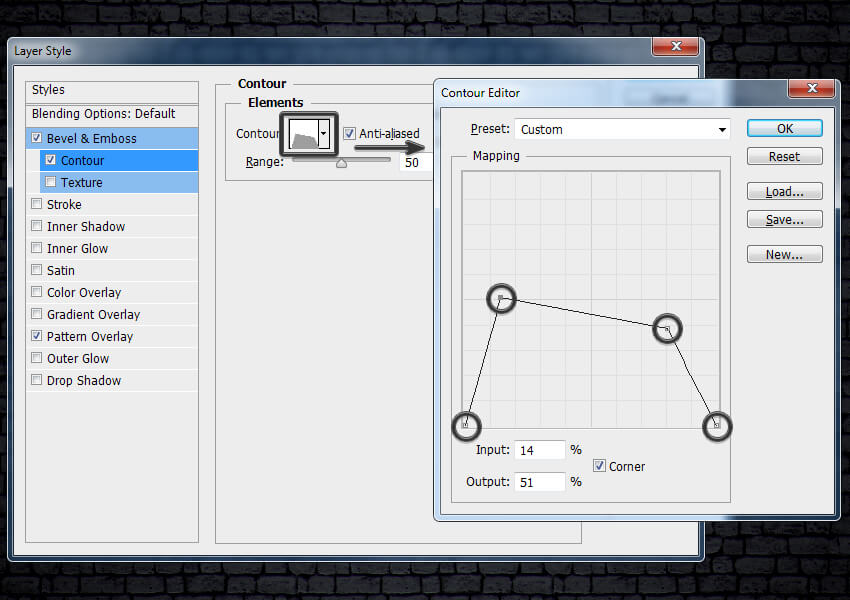
Step 6
While you are still in the Contour tab, create a custom Gloss Contour with these settings:
Addfour points to the contour curve. To add points, click anywhere on the curve. Now set an Input and an Output for each of these points.
- Point 1 – Input: 0% Output: 0%
- Point 2 – Input: 14% Output: 51% and check the Corner box
- Point 3 – Input: 80% Output: 39% and check the Corner box
- Point 4 – Input: 100% Output: 0%
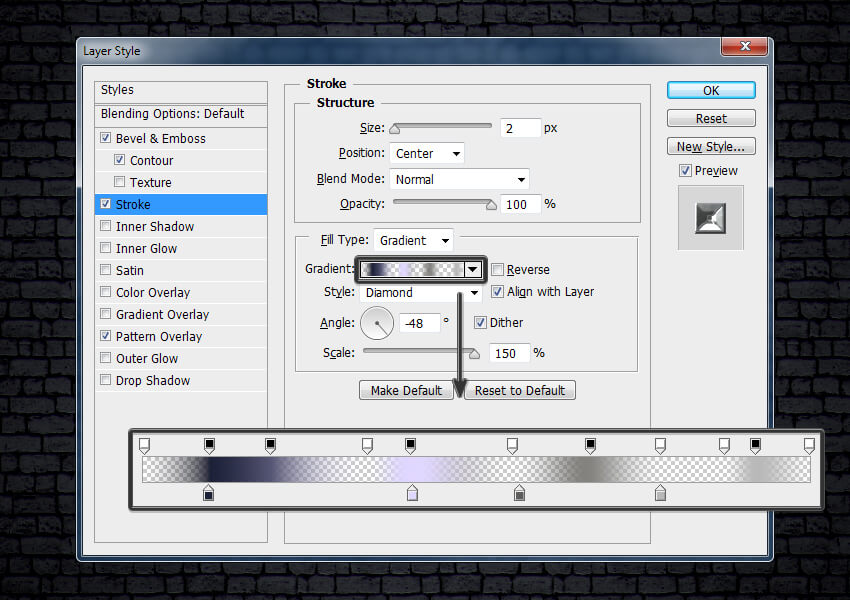
Step 7
Add a Stroke with these settings:
- Size: 2 px
- Position: Center
- Blend Mode: Normal
- Opacity: 100%
- Fill Type: Gradient
- Style: Diamond
- Angle: -48°
- Check the Dither box
- Scale: 150%
- Click on the Gradient and set these transparency and color stops:
- 6 transparency stops with Opacity:0% onLocations: 0, 34, 55, 78, 87 and 100%
- 5 transparency stops with Opacity:100% onLocations: 10, 19, 40, 67 and 92%
- Color stop 1 – Color:
#23253aLocation: 10% - Color stop 2 – Color:
#ddd6ffLocation: 40% - Color stop 3 – Color:
#5f5d5bLocation: 56% - Color stop 4 – Color:
#b7b7b7Location: 78%
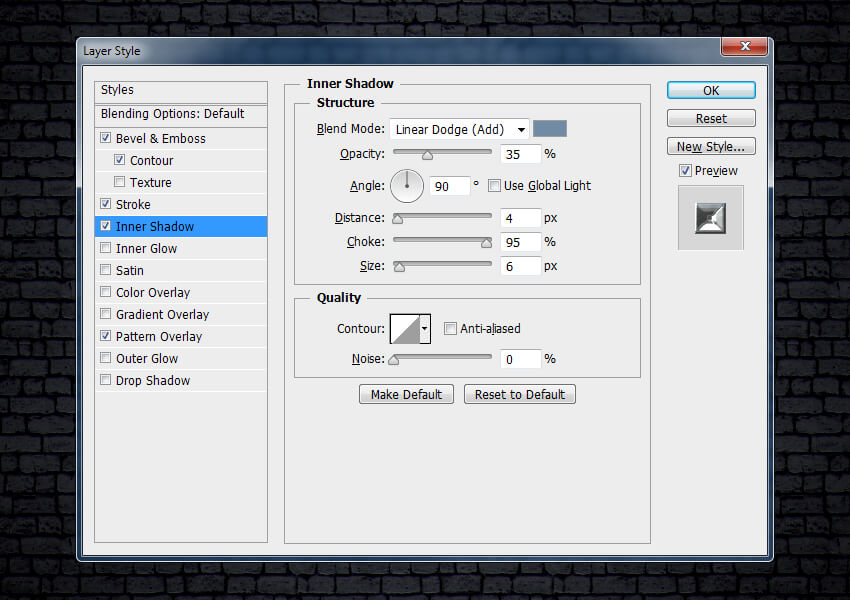
Step 8
Add an Inner Shadow with these settings:
- Blend Mode: Linear Dodge (Add) with Color
#7789a2 - Opacity: 35%
- Uncheck the Use Global Light box before setting an Angle: 90°
- Distance: 4 px
- Choke: 95%
- Size: 6 px
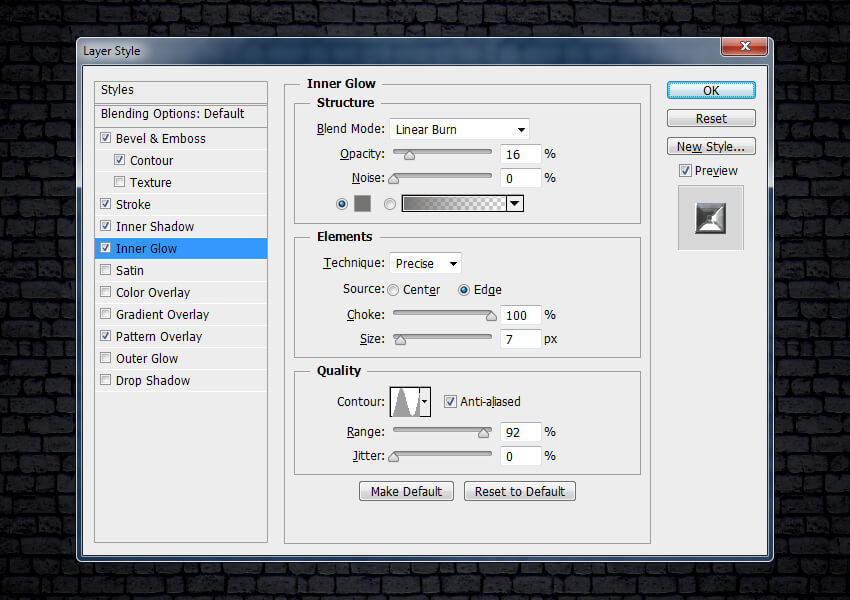
Step 9
Add an Inner Glow with these settings:
- Blend Mode: Linear Burn
- Opacity: 16%
- Pick the color
#74726f - Technique: Precise
- Source: Edge
- Choke: 100%
- Size: 7 px
- Contour: Ring
- Check the Anti-aliased box
- Range: 92%
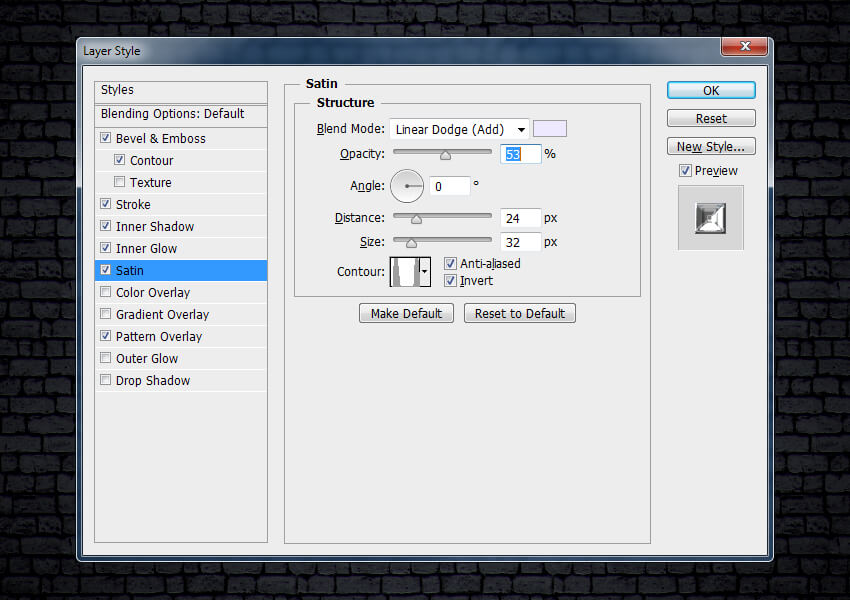
Step 10
Add a Satin effect with these settings:
-
Blend Mode: Linear Dodge (Add) with the color
#ece8ff - Opacity: 53%
- Angle: 0°
- Distance: 24 px
- Size: 32 px
- Check the Anti-aliased and Invert boxes
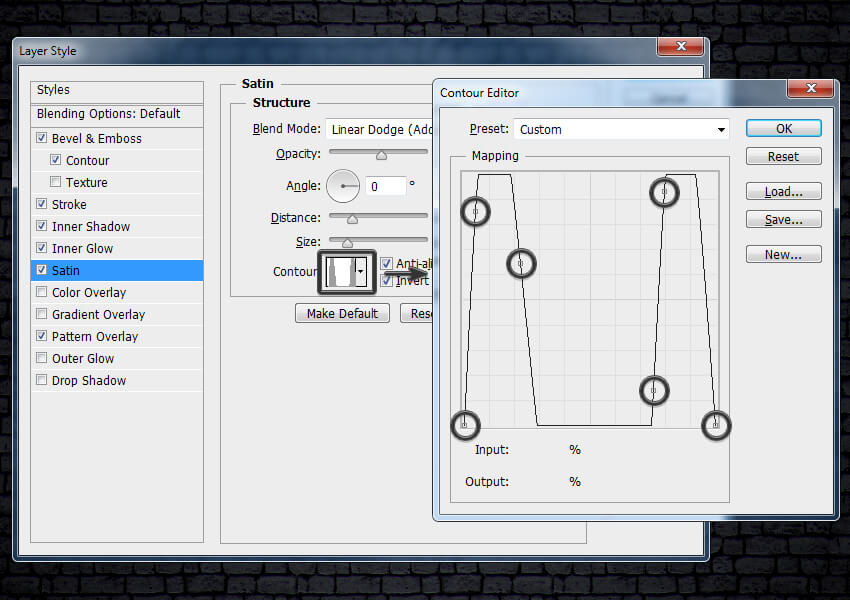
Step 11
While you are still in a Satin tab, create a custom Gloss Contour with these settings:
Addsix points to the contour curve. To add points, click anywhere on the curve. Now set an Input and an Output for each of these points.
- Point 1 – Input: 0% Output: 0%
- Point 2 – Input: 4% Output: 85%
- Point 3 – Input: 22% Output: 65%
- Point 4 – Input: 75% Output: 14%
- Point 5 – Input: 80% Output: 93%
- Point 6 – Input: 100% Output: 0%
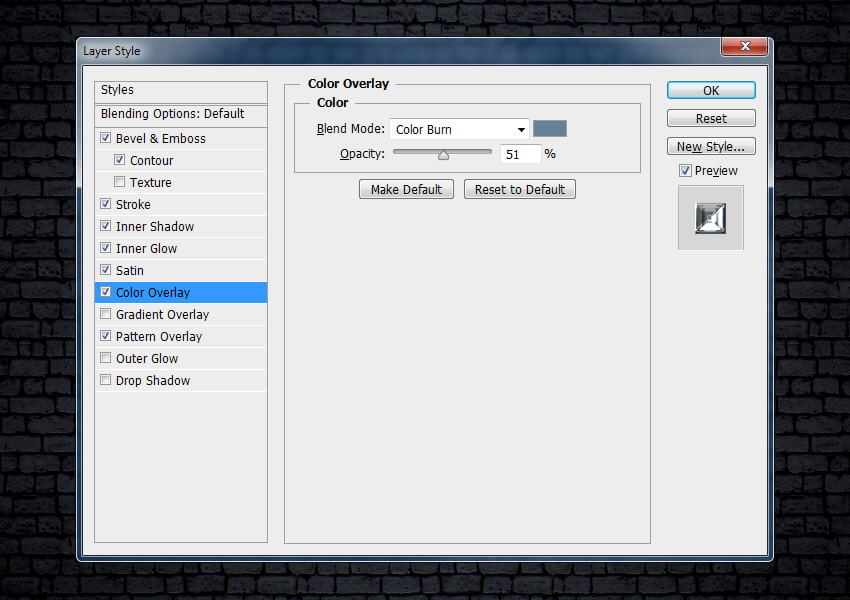
Step 12
Add a Color Overlay with these settings:
- Blend Mode: Color Burn
- Pick the color
#6d8096 - Opacity: 51%
Step 13
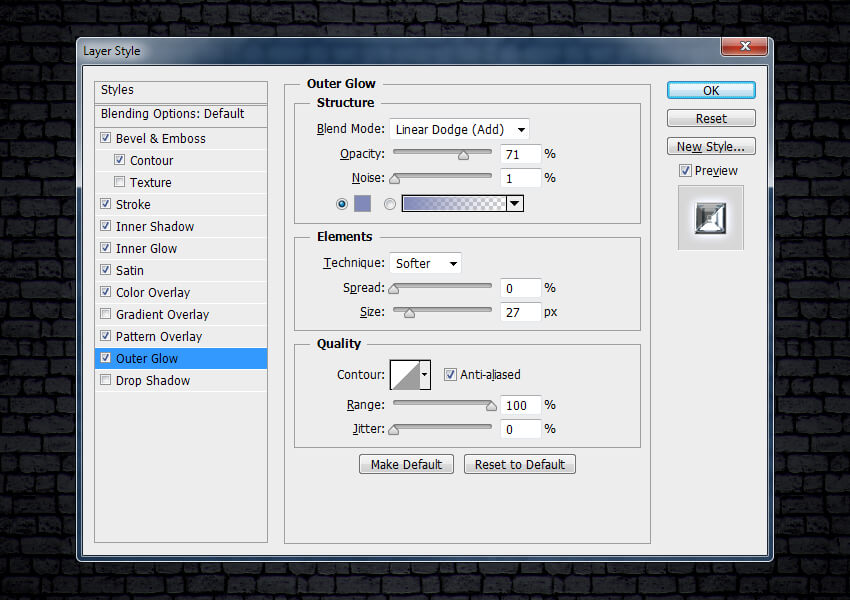
Add an Outer Glow with these settings:
- Blend Mode: Linear Dodge (Add)
- Opacity: 71%
- Noise: 1%
- Pick the color
#8288b6 - Technique: Softer
- Spread: 0%
- Size: 27 px
- Check the Anti-aliased box
- Range: 100%
- Jitter: 0 %
Step 14
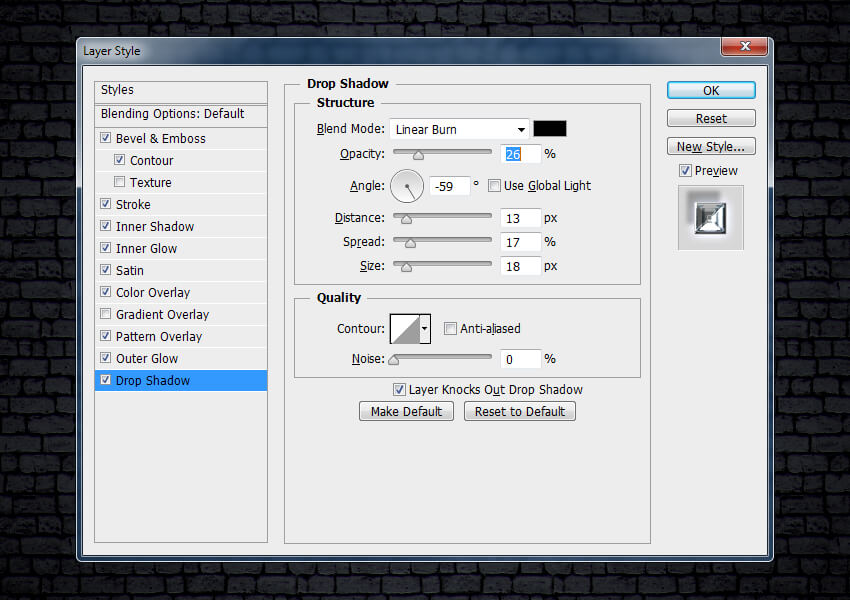
As a final step, add a Drop Shadow with these settings:
- Blend Mode: Linear Burn
- Pick the color
#010201 - Opacity: 26%
- Uncheck the Use Global Light box before setting an Angle: -59°
- Distance: 13 px
- Spread: 17%
- Size: 18 px
Hit OK to apply all of the blending options.
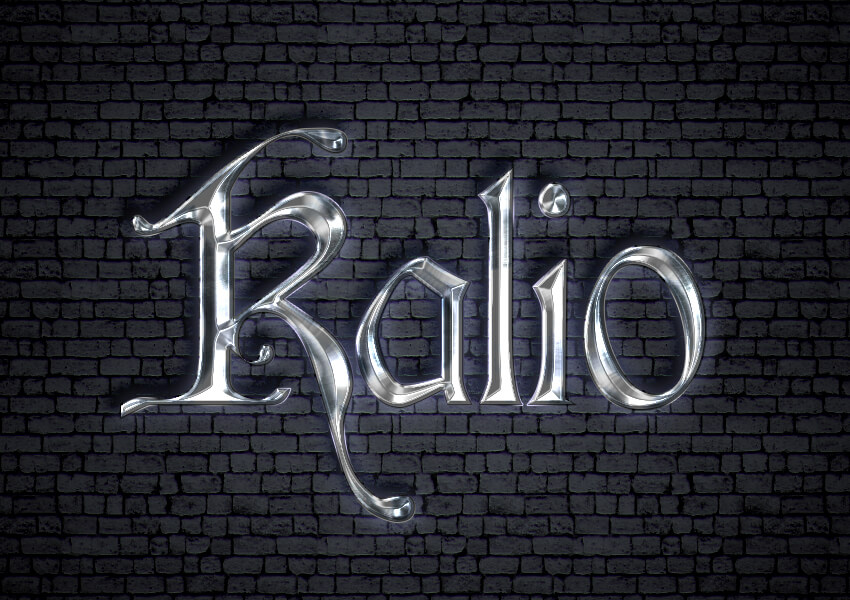
And this should be your final result.
Congratulations! You’re Done!
In this tutorial, you learned how to create a metallic medieval text effect in Photoshop. We created a text layer and added many different effects in order to create our final text effect.
I hope you’ve enjoyed this tutorial, and if you like the final effect, don’t forget to save this style to your Layer Styles palette for future projects.
Sources via : tutsplus.com